- Use the adhesive scraper to remove the excess urethane from the liftgate glass and body.
- Temporarily reconnect the CHMSL to the harness in the center of the liftgate and have an assistant depress the brake pedal. Ensure that the CHMSL lights up properly. If any of the LEDs have been damaged, replace the CHMSL.
- Close the liftgate.
- If any spacers were damaged, attach new spacers to the glass at the locations shown.
CAUTION:
To prevent degraded radio reception, ensure that the spacers do not contact any part of the antenna grid.
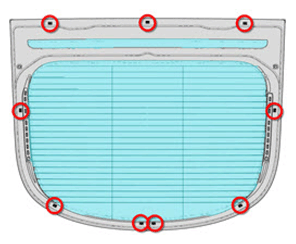 Courtesy of TESLA, INC. Courtesy of TESLA, INC.
|
- Apply primer as directed by the adhesive manufacturer.
NOTE:
Check the primer and adhesive packaging for the appropriate working times for each product. Prepare the necessary tools and work environment so that the glass can be installed within the specified working times.
NOTE:
This procedure requires approximately 2 tubes of urethane.
- Fully clean the urethane area.
- Cut the applicator tip on the urethane tube to the appropriate size.
NOTE:
Cut a triangular cross-section into the applicator approximately 8 mm wide and 14 mm tall.
- Apply the urethane to the liftgate glass. Be sure to follow the original pattern.
CAUTION:
To prevent degraded radio reception, do not allow adhesive to contact the radio antenna grid. Ensure that the adhesive is far enough away from the lower edges of the antenna grid that it will not touch the grid once the glass is installed.
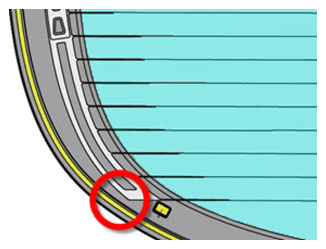 Courtesy of TESLA, INC. Courtesy of TESLA, INC.
|
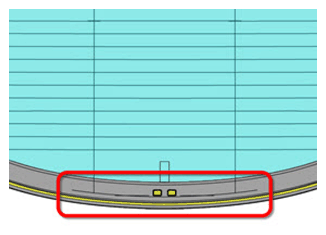 Courtesy of TESLA, INC. Courtesy of TESLA, INC.
|
- Install the rear liftgate glass, making sure that the gaps between the glass and the liftgate are even front to back and side to side. Evenly and progressively press the glass onto the spacers.
- Clean off any excess adhesive that was extruded from the joint.
WARNING:
Do not drive the vehicle until the adhesive manufacturer's recommended minimum drive-away time has passed. Dow Betaseal Express has a drive-away time of 1 hour minimum in temperatures of 0°F (-18°C) or warmer. If necessary, leave the tape applying pressure to the glass on the vehicle and advise the customer that they can remove it after 24 hours. Additionally, advise the customer that they should avoid high driving speeds and speed bumps for the next 24 hours.
- Reconnect all harness connections.
- Have an assistant use a hose to spray water along the edges of the liftgate glass. Ensure that no water leaks into the interior.
- Reinstall all components that were removed for access.