Rear Vent Control Motor Replacement
- Remove the utility pocket (see
UTILITY POCKET REMOVAL/INSTALLATION
).
- Remove the center console (see
CENTER CONSOLE REMOVAL/INSTALLATION
). Remove the rear vent duct (see step 5 on DASHBOARD/STEERING HANGER BEAM REMOVAL/INSTALLATION
).
- Remove the shift lever (see
SHIFT LEVER REMOVAL
).
- Disconnect the 5P connector (A) from the rear vent control motor. Remove the self-tapping screws and the duct (B) from the heater unit.
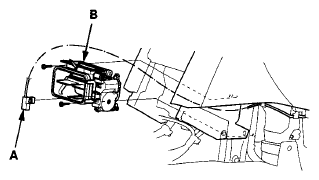 Courtesy of AMERICAN HONDA MOTOR CO., INC.
- Remove the self-tapping screws and the rear vent control motor (A).
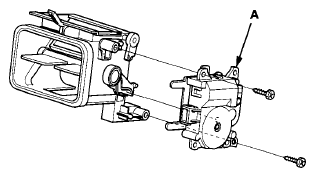 Courtesy of AMERICAN HONDA MOTOR CO., INC.
- Install the motor in the reverse order of removal. Make sure the pin on the motor is properly engaged with the linkage. After installation, make sure the motor runs smoothly.